About & Setup

SYSTEM OVERVIEW

My WiFi Alarm System Overview

About My WiFi Alarm

My WiFi Alarm Provides Remote Notification 24/7

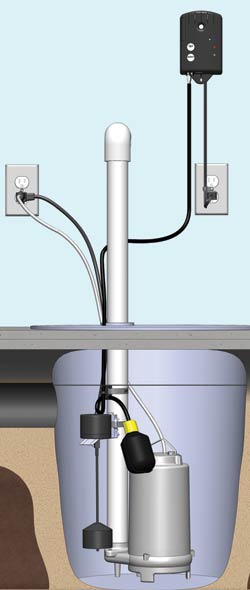
My WiFi Alarm system monitors and reports any residential alarm condition (contact closure), including sump high water level (float switch), or under/over temperature alarms. When the contact closes, the alarm notifies the user locally (audible and visual alarms) and remotely via SMS text messages and/or email over a WiFi or Ethernet network to a smartphone, tablet or computer. Text message notifications can be sent to a cell phone with an active SMS service. The horn can be silenced when the alarm is active, but the alarm light remains on until the condition is cleared. Once the condition is cleared, the alarm will automatically reset.

The alarm works with your existing WiFi or Ethernet network, so it does not rely on cellular connection which means NO monthly fees or contracts. It's an excellent solution for areas with poor cellular service. My WiFi Alarm is great for businesses, rental properties and seasonal homes to help prevent costly damage.

Product Features
  • NEMA 1 enclosure rated for indoor use
  • Automatic alarm reset
  • LED indicators for alarm (red), power on (green), and network status (blue)
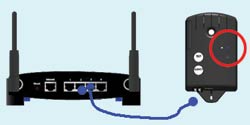
  • WiFi or Ethernet connectivity for remote alarm notification
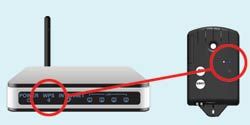
  • WiFi Protected Setup (WPS) push-button connect feature for simplified connection
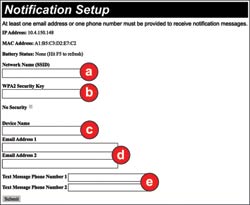
  • Text and/or email notifications: alarm, power lost, power restored, low battery and alarm offline
  • Notifies up to 4 contacts (2 text, 2 email contacts)
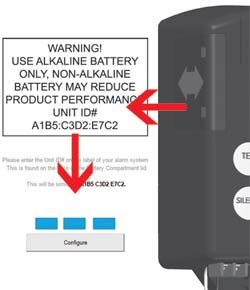
  • If primary power fails, the alarm continues to operate locally due to 9 VDC battery backup (not included)
  • Low battery chirp
  • External terminal block for easy float switch installation
  • Auxiliary alarm contacts included to connect to remote device
  • Can serve as a high or low level alarm depending on float switch model
  • Optional float switch models and splice kit available
Product Specifications
  • Voltage: Primary: 120 VAC, 60 Hz, 2.4 watts max. Secondary: 9VDC
  • Battery Backup Power: 9 VDC
  • Alarm Enclosure: 6 x 4 x 2.25 inches (15.24 x 10.16 x 5.71 cm), NEMA 1 plastic
  • Alarm Horn: 87 decibels at 10 feet (3 meters)
  • Auxiliary Alarm Contacts: Voltage - 120 VAC; Current: 0.5 amps max NO, 0.5 amps max NC
  • Power Cord: 6 feet (1.8 meters)
  • Float Switch Connection Terminal: For float switch connection only. Do not apply power. (voltage across terminals is 8-9 VDC)
  • Float Switch: SJE SignalMaster® control switch with mounting clamp. Cable: 15 feet (4.57 meters), flexible 18 gauge, 2 conductor (UL) SJOW, water resistant (CPE); Float: 2.74 inch diameter x 4.83 inches long (7.0 x 12.3 cm), high impact, corrosion resistant polypropylene housing for use in sewage and water up to 140 degrees F (60 degrees C)
  • WiFi: Connect using push-button WiFi Protected Setup (WPS) or manually by using Ethernet connection (Ethernet cable not included)
  • Ethernet: Requires an ethernet connection (Ethernet cable not included)
  • CSA Certified
  • Five-Year Limited Warranty
  • NOTE: Cellular WiFi hotspots are not recommended for use with this WiFi alarm, as intermittent or unreliable notification service can result.

SYSTEM SETUP

STEP 1: WPS WiFi Network Setup


STEP 1: Ethernet Network Setup


STEP 2: Verification (Unit ID)


STEP 3: Notification Setup


Setup

Review System Requirements

STEP 1: WPS WiFi Network Setup
  1. Plug the alarm power cord into a 120V receptacle.
  2. Press the WPS button on your wireless router (often on the back side of the router).
  3. Press the WPS button on the alarm - the blue network light will flash continuously.
The blue network status light will illuminate steadily when the alarm is successfully connected to the wireless network.

STEP 1: Ethernet Network and Non-WPS WiFi Network Setup
  1. Connect an Ethernet cable (not supplied) from the alarm Ethernet port to an unused network router LAN port.
  2. Plug the alarm power cord into a 120V receptacle.
  3. The alarm will automatically detect the Ethenet network and connect upon power up.
The blue network status light will illuminate steadily when the alarm is successfully connected to the Ethernet network.

STEP 2: Verification
  1. After the alarm is successfully connected to the network, allow 2 minutes before proceeding.
  2. Using your internet connected device (laptop, computer, etc.), open a new web browser window or tab. NOTE: you must be connected to the same router as your alarm.
  3. Type the following into the address field at the top of your browser (or click here): setup.mywifialarm.com
  4. Follow the registration link.
  5. After reading and accepting the End User License Agreement, enter your alarm's unit ID# located on the back of the battery compartment cover (do NOT enter the colons).
  6. If the alarm has not been verified, you will be required to enter an email address to receive a verification link. Enter your email address and select REQUEST VERIFICATION. NOTE: All future alarm notifications will be sent to this verification address in addition to the email address(es) entered on the setup page.
  7. An email will be sent to the verification email address entered with a link to the Notification Setup page. Click this link to access the Notification Setup page. This email must be received and opened on the same device used for the steps above.
  8. If the alarm has already gone through the verification process, the web browser will immediately be redirected to the Notification Setup page.

STEP 3: Alarm Notification Setup
  1. On the Notification Setup page, fill in the correct data. NOTE: steps a. and b. are only required if connecting to a wireless network that does not support WPS connection.
    a. Network Name (SSID): Enter the wireless router's network name (also called SSID) as it appears on the WiFi connection for your device (smartphone, tablet, computer, etc).
    b. WPA2 Security Key: Enter the wireless router's security key (password) OR check "No Security" box if the wireless network does not require a password.
    c. Device Name: Enter a unique device name for each alarm being installed. EXAMPLE: "Cabin Sump Alarm".
    d. Email Address(es): Enter the email address(es) which will be receiving email notifications from the alarm.
    e. Phone Number(s): Enter the phone number(s) of the device(s) which will be receiving text message notifications from the alarm.
    NOTE: A minimum of one email address or text message phone number must be entered to receive alarm notifications.
  2. Click the Submit button to save your notification data.
  3. If connecting to a wireless network that does not support WPS connection, enter the router's Network Name (SSID) and WPA2 Security Key, then disconnect the Ethernet cable. Remove the backup battery and disconnect the power cord from the power receptacle. Once the green power light is no longer illumuniated, plug the power cord back into the power receptacle.
The blue network status light will illuminate steadily when the alarm is successfully connected to the wireless network.

STEP 4: Setup Testing
  1. Press and release the "TEST" button on the alarm. The alarm horn will sound and the red alarm light will illuminate while the "TEST" button is being held.
  2. Verify that an alarm notification is received via all entered email and/or text phone numbers.
  3. NOTE: It may take several minutes for the message to appear in your email inbox or message folder, depending upon email server traffic or other circumstances. If you have not received a notification within 5 minutes, verify the email address and/or phone number information is entered correctly and that any email filters are set to allow messages from mywifialarm@mywifialarm.com.

    While using a WiFi connection, a signal strenth rating will be sent with notifications:
    5.0 - 10.0 Great!
    3.0 - 4.9 Good. No signal loss is expected.
    2.0 - 2.9 Marginal. You may experience occasional signal loss.
    0.0 - 1.9 Weak. Move alarm closer to wireless router.